It's almost Earth Day, so here's an eco-friendly tip I learned from a friendly bagger at Publix. I had come through the line with my sad little reusable shopping bags. They were floppy and flimsy because the little plastic pieces that sit in the bottoms had broken and/or fallen out; they had been pretty neglected and we were kind of embarrassed to keep using them. If this has happened to you too, don't panic. There is a simple, free solution. Find an old cardboard box, cut a side off, measured to the dimensions of the bottom of the bag and slide it in. You'll be back to proudly carrying your groceries again in style. So easy, so earth-friendly and so economical!
Friday, April 20, 2012
Saturday, April 14, 2012
Frozen Strawberry Muffins
Who doesn't love chocolate covered strawberries? They are delicious, but they can't be stored very well. Here's an easy, delicious variation of a chocolate dipped strawberry that can be frozen and saved for later.
All you need is some strawberries, almond bark (chocolate or white chocolate) and a mini-muffin tin. For a 24-cup mini-muffin tin, you'll use about a pint of strawberries and about 18-20 oz of almond bark.
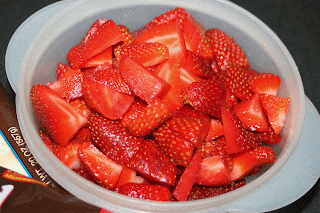
First, rinse the strawberries and cut off the tops. Then, chop them into smaller pieces. You can quarter them, or cut them smaller, depending on what you like better. Blot them dry with a towel, or just let them air dry.
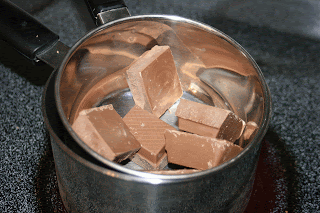
Next, melt the almond bark in a double boiler.
(Just fill a larger pot with water about 1/3 - 1/2 full, then put a smaller pot inside of it. When the water in the bottom pan boils, it melts the chocolate in the top pan slowly so it heats up evenly).
You can melt it in the microwave, but the double boiler is easier to work with. Stir up the blocks of bark as they melt and when they get to a creamy consistency pour it into the muffin tins. I put cooking spray on my tin, because I thought it might be easier to remove them in the end. Not sure if it is necessary though.
Once the tin is filled with chocolate, just place the strawberry pieces inside of the bark. It's best if you push them in and make sure they are covered really good by the bark. Stuff in as many strawberries in as you can. Then, just stick the muffin tin into the freezer. After a few hours, take them out of the freezer and try to pop them out. The best way is to take the tip of a knife and use it to push them out. If they don't come out easy then let the pan sit out for a minute or two so the almond bark gets a little softer.
Voila! You can serve them immediately, or put them in a freezer-tight container and save them for 3 or 4 days. If you use frozen strawberries instead of fresh ones, you can probably save it even longer. I'll probably try experimenting with different fruits next like oranges or raspberries. Anything tastes good when it's covered with chocolate, right?
Wednesday, April 11, 2012
Teacher Treats
It was my turn to bring the teacher appreciation treats to school, and I found this awesome idea for a "Marvelous and Magnificent" teacher. I found the original idea here. I loved it, but had to make 15 of these so the larger plastic paint cans were out of the budget. Luckily, I found these cute mason jars at Michael's that were only $1.29, and a 20% off entire purchase coupon! My other stroke of luck, a BOGO on M&Ms at Publix. Just fill up the jars, pick out a cute polka-dot ribbon and tie the poem to the side. It was so easy, that the hardest part was not eating any of the M&Ms.
I'm a graphic designer by trade, so I thought the poem card could use some sprucing up. I also thought it would be nice to share it with everyone else, so if you like the design you can print it at the end of this post. This is such a cute idea that could work for so many different situations. With a few tweaks to the poem, you could celebrate an "M&M" mom or dad, a volunteer or even a good friend.
Lollipop Garden
I found a new Easter tradition! I either read or dreamed someone writing about jellybean seeds and lollipop flowers and I thought, what a great idea! On Easter eve, I told the kids that we were going to plant a special garden, and we put some paper shreds in the bottom of two little buckets. Emily got a handful of jellybeans and Travis, who only eats goldfish, got a handful of goldfish to "plant" in the buckets. Then we talked about how the Easter bunny would hop over to them and make something grow in the morning. Here's what they were excited to find:
Goldfish carrots and lollipop flowers! They loved it!
For the carrots, just put a handful of goldfish in a plastic icing decorator bag and tie it off with some green ribbon. For the lollipops, I just cut out some random flower shapes, punched a whole and taped the lollipop in place. It was so much fun and I think the kids actually liked these better than their baskets.
Sunday, April 1, 2012
Easter Basket Wreath
The same sad looking wreath had been hanging up on my front door since Christmas so it was definitely time to change it out. I ended up with this fun, fancy Easter Basket Wreath. It was easy to make and I'm really proud of how it ended up. Here's what I did.
My first stop was actually to the craft store where the two silly monkeys and I found these pretty plastic eggs. We took them over to the craft section and matched them up to some tulle and netting. Tulle and netting are fantastic materials because they are soft, beautiful and cheap! We picked four colors and got a yard of each. We mixed up the textures and got some shiny tulle with really tiny holes, and some matte netting with larger holes. The next step was to find a wreath form to make it on. I had two possibilities to start: the small white styrofoam circle that had been sitting under my garage since Christmas of 2009 and the larger woven one I found at the Dollar Store. I went with the larger because it fit the door better and because it reminded me of an Easter Basket.
A few years ago I had made one of those adorable tulle tu-tu's, so I decided the same technique could work here. To do it, just cut the tulle and netting into long strips. The length will depend on the size of the wreath you use, because you need enough length to wrap it around the wreath and still have some sticking out. My wreath was rather large, so my strips were about 3" or 4" wide and about 18" to 20" long. (Make sure you cut one and try it out on the wreath before you cut them all, otherwise you'll have to head back to the craft store.) Cutting out the strips was kind of boring, but the good news is the strips do not have to be identical in size. Turns out cutting tulle is tricky. When it is unfolded it is hard to see and my scissors kept snagging the holes. The fastest way to do it was to fold the fabric a bunch of times and cut out several strips at one time.


To tie the tulle/netting on, take a strip and make a loop over the wreath. Next, wrap the bottom tails of the loop around the wreath and pull it tight. Just repeat this with all the strips, trying to keep them as close together as possible. I kept the same pattern, but you could do it randomly if you wanted...totally up to you!
This is what mine looked like halfway after a little fluffing. I almost kept going all the way around, and I'm thinking someday I may do that. This time though, I wanted to see the wreath form because it looked so much like a basket.
The cracks on the plastic eggs were bugging me, so I hot glued some ribbon to the back of the egg, then tied them in the front. Attach the eggs to the wreath with hot glue.
And, voila! That's it. Happy Easter!
Subscribe to:
Comments (Atom)


